Part of what makes drones such a valuable technology is their ability to collect large volumes of data. While drones can collect data in many different ways, one of the most widespread methods is drone mapping. From real estate, to environmental science to mining, drone mapping has been a game changer and as technology advances, it’s becoming useful in more and more fields. So what is drone mapping and how can you use it?
What is drone mapping?
Drone mapping (sometimes called drone surveying) is a fairly straightforward way to collect data with drones . As it’s name suggests, it involves mapping an area of your choice with a drone to produce all kinds of useful outputs like an orthomosaic, digital elevation models and 3D models. Drone mapping allows a level of highly detailed data collection across a large area that isn’t possible through satellite images or traditional ground surveying.
Drone mapping works by taking many aerial images of an area of interest. Through a process called photogrammetry, these many images are then turned into a single complete image, called an orthomosaic. All the objects and features in an orthomosaic are scaled and can be georeferenced. This means that it’s possible to make measurements associated with location, distance, and area.
Photogrammetry software can also determine 3D characteristics in an environment. Outputs from drone mapping can therefore be used to create digital replicas of real areas for analysis.
For photogrammetry software to be able to create an accurate orthomosaic from drone pictures, a few things need to happen:
1. The drone has to fly in a pattern that allows it to photograph everything in an area of interest. We think of this like a lawnmower in the sky.
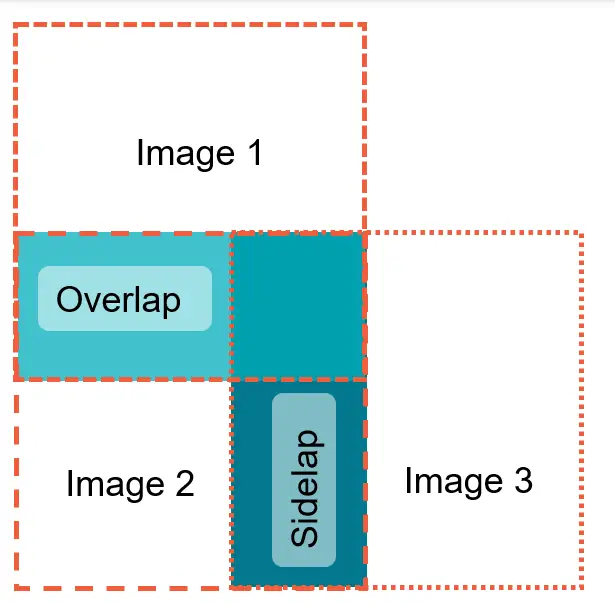
2. The photos need enough overlap and sidelap that the photogrammetry software can identify common features between pictures. These common features are called ‘tie points’ since they help tie the separate images together.
3. The images need to be able to ‘geotagged’ with their location. Images are stamped with the location of the drone at the time of capture, based on the on-board GPS. We can gain more accurate location in three different ways: Ground control points (GCPs), post-processing kinematic positioning (PPK) or real-time kinematic positioning (RTK).
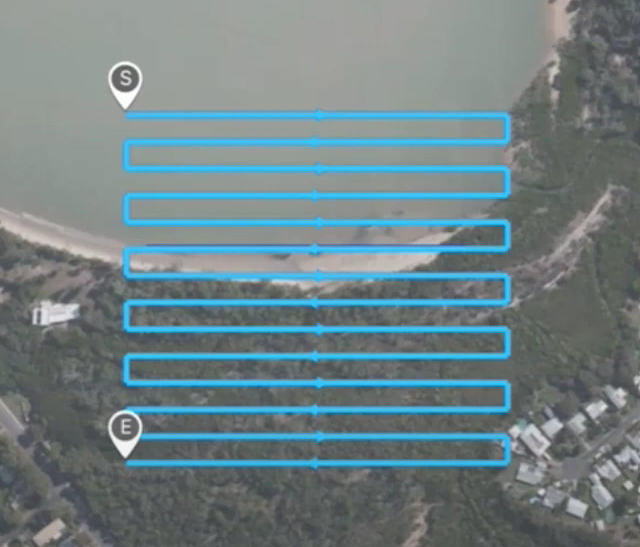
An example of the flight path a drone might follow for a drone mapping mission, created using Autel Explorer.
How to start drone mapping
Supporting apps
The good news for drone mapping beginners is that there are plenty of apps to help you with drone mapping. Apps like OpenSky will tell you where it is safe to fly your drone. Others, like Pix4D Capture, automate the drone mapping flight. All you have to do is specify your mapping area, amount of overlap and sidelap for images (we recommend starting at 80% for both), and flight altitude. The app will then automatically generate the most efficient path for the drone to fly to capture that data. You can read about more of the apps available to support drone mapping here. The GeoNadir YouTube channel also has video guides on creating mapping missions with different apps.


Picking overlap, sidelap and altitude
As a general rule, we recommend 80% overlap and sidelap. Overlap is measured between sequential photos, while sidelap refers to sequential flight lines or runs. That being said, to get the best output from your drone mapping, it’s good to be flexible. If the area that you’re mapping has many distinctive features, you might be able to reduce overlap and sidelap. Less overlap and sidelap will mean you can map a larger area in one flight, but you’re more likely to have issues in post-processing.
Flight altitude will impact how much area you can map in one flight, and the resolution of the final orthomosaic. The higher you fly, the larger the area you can map in one flight, but the lower your image resolution. If you need to distinguish small features you will need to fly lower, or use a higher resolution camera. You can read more about how to get the right resolution for your mapping mission here.
Every time you map somewhere new or map under different conditions, you might need to tweak the methods you use. It’s always worth doing a test flight to check you’re getting good quality data before doing any big mapping missions.
Accurately geo-referencing your mapping mission
While all drones come with a GNSS (including GPS) receiver, they’re usually only accurate to a few meters. To get better accuracy, you need to use GCPs, PPK, or RTK systems.
GCPs are the traditional method for improving the positional accuracy of drone mapping. GCPs are points on the ground with a known position. They provide a way to check and correct the georeferenced accuracy of the orthomosaic. The more GCPs, the more accurate the geographical positioning of the orthomosaic. However, placing multiple GCPs out across a mapping area can be time-consuming, and isn’t possible in every scenario (e.g. mapping marine ecosystems).
PPK and RTK systems are both more recent technological developments and aim to eliminate the need for GCPs. Both methods use a base station that consistently records its position to help correct and improve the accuracy of the drone’s location. Post-processing kinematic systems, as their name suggests, do this correction as part of post-processing. In comparison, real-time kinematic systems do this correction in real-time as the drone is flying.
So which is better? PPK is more reliable but requires a longer processing time post-flight. RTK is more prone to issues, however, you get accurate positioning data in real-time. You can read more about the pros and cons of these two systems here.
What can you do with drone mapping data?
So now you know the basics to go out and collect good quality data with drone mapping. What do you do with the data once it’s collected? The next step is to process the images in photogrammetry software to create a range of useful outputs like digital elevation models, 3D models and orthomosaics.
If you upload your datasets to GeoNadir, we’ll automatically generate the orthomosaic for you, and store your data for free! By uploading your data to GeoNadir, you’re also making your drone data FAIR (Findable, Accessible, Interoperable, and Reusable), allowing others to use and learn from your data to help make the world a better place.
Alternatively, if you prefer to process your own data, there are a range of photogrammetry software options, both free and commercial and each has its own advantages and disadvantages in terms of accuracy, user-friendliness, and customizability.

Get flying!
So what are you waiting for? Get out and get mapping! If you’d like more detail on how to start drone mapping, you can check out our free training.
If you need some inspiration for what you can achieve with your drone, you might like to read “What can you do with a drone?” or check out some of the innovative ways people are using drones on the Stories from Above blog.